반응형
지난 시간에 이어 레이아웃을 공부해보겠다.
Row + Column + Container를 복합적으로 사용해보고 Expanded에 대해 알아보겠다.
Expanded는 빈공간을 채우는 확장이라고 생각하면 된다.
DartPad : https://dartpad.dartlang.org/
DartPad
dartpad.dartlang.org
1. Row에 Container 3개 만들기
지난 시간에 배운 Row에 Container를 3개 넣어보자.
import 'package:flutter/material.dart';

void main()=>runApp(MyApp());

class MyApp extends StatelessWidget{
  @override
  Widget build(BuildContext context){
    return MaterialApp(
      home: Scaffold(
        appBar: AppBar(
          title: Text('Hello YoungMap'),
        ),
        body: Row(
          children: [
            Container(
              color: Colors.red,
            ),
            Container(
              color: Colors.green,
            ),
            Container(
              color: Colors.blue,
            )
          ],
        ),
      ),
    );
  }
}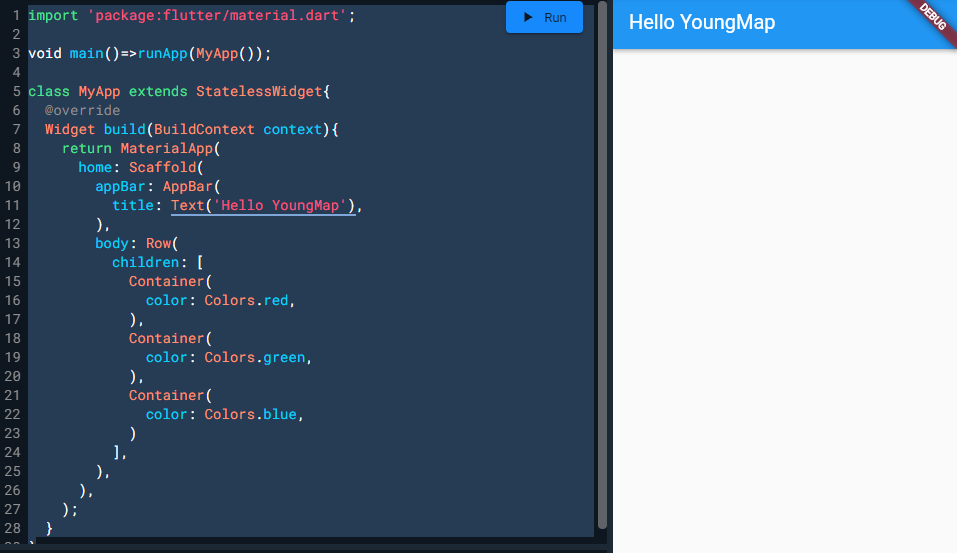
결과는 아무것도 안나온다.
Container는 담는 그릇인데 속에 아무것도 없으므로 사이즈가 정해지지 않았기 때문에다.
사이즈를 지정해보자.
body: Row(
  children: [
    Container(
      width: 100,
      height: 100,
      color: Colors.red,
    ),
    Container(
      width: 100,
      height: 100,
      color: Colors.green,
    ),
    Container(
      width: 100,
      height: 100,
      color: Colors.blue,
    )
  ],
),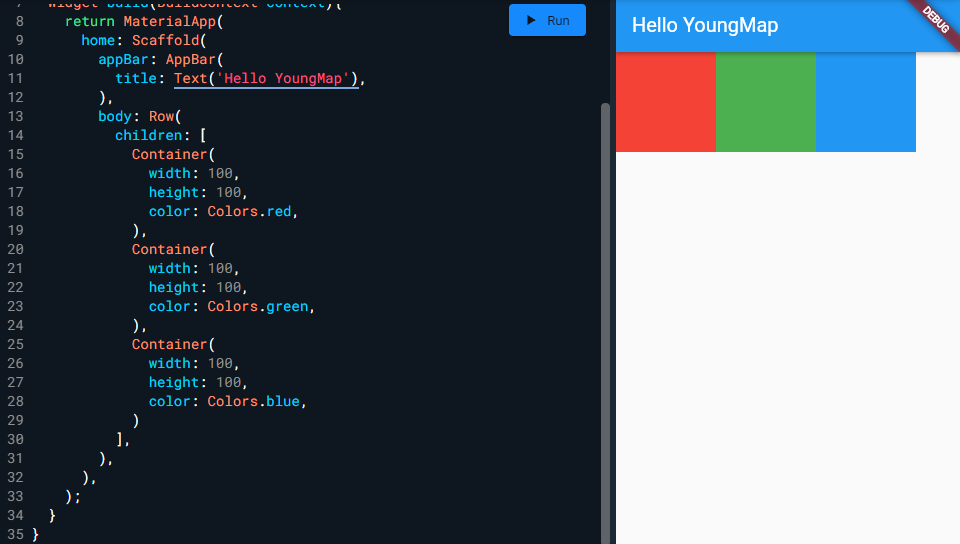
사이즈를 지정하니 잘 나온다.
빨강과 녹색의 사이즈를 바꾸어보자.
body: Row(
  children: [
    Container(
      width: 130,
      height: 100,
      color: Colors.red,
    ),
    Container(
      width: 100,
      height: 200,
      color: Colors.green,
    ),
    Container(
      width: 100,
      height: 100,
      color: Colors.blue,
    )
  ],
),
2. Column 추가
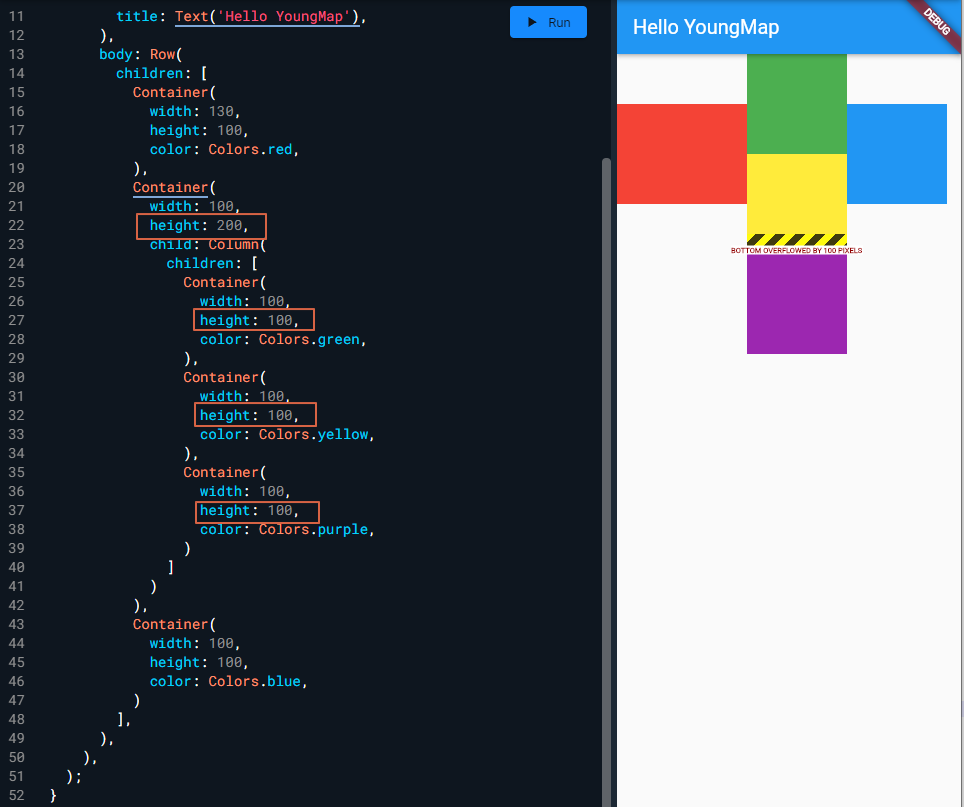
가운데 녹색을 Column 3개로 대체해보자.
Container(
  width: 100,
  height: 200,
  child: Column(
    children: [
      Container(
        width: 100,
        height: 100,
        color: Colors.green,
      ),
      Container(
        width: 100,
        height: 100,
        color: Colors.yellow,
      ),
      Container(
        width: 100,
        height: 100,
        color: Colors.purple,
      )
    ]
  )
),
여기서 주의해야한다.
담는 그릇의 높이를 200이라고 했는데 내부에 총 300의 내용물이 있어서 오버플로우 에러가 발생하였다.
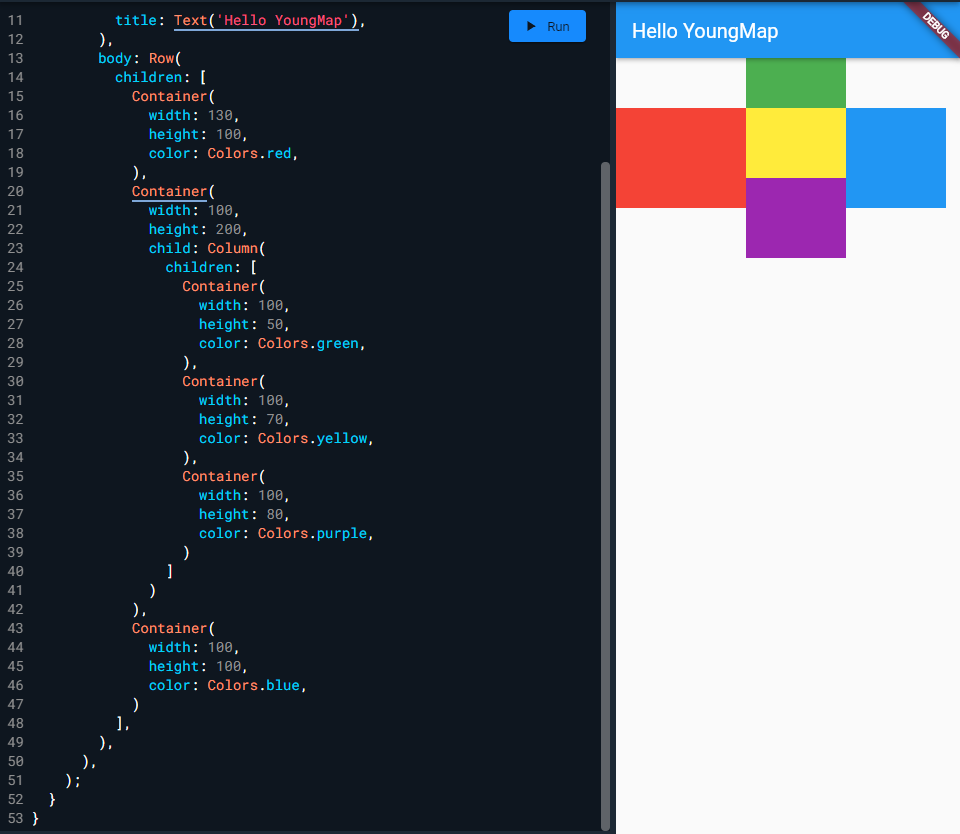
자식의 높이가 넘치지 않도록 소스를 수정한다.
Container(
  width: 100,
  height: 200,
  child: Column(
    children: [
      Container(
        width: 100,
        height: 50,
        color: Colors.green,
      ),
      Container(
        width: 100,
        height: 70,
        color: Colors.yellow,
      ),
      Container(
        width: 100,
        height: 80,
        color: Colors.purple,
      )
    ]
  )
),
3. Expanded 사용
Expanded 위젯은 사이즈 지정없이 부모의 크기만큼 채우는 기능을 한다.
노란색 상자를 감싸보자.
Container(
  width: 100,
  height: 200,
  child: Column(
    children: [
      Container(
        width: 100,
        height: 50,
        color: Colors.green,
      ),
      Expanded(
        child: Container(
          color: Colors.yellow,
        ),
      ),
      Container(
        width: 100,
        height: 80,
        color: Colors.purple,
      )
    ]
  )
),
사이즈가 없는데도 동일한 효과를 낸다.

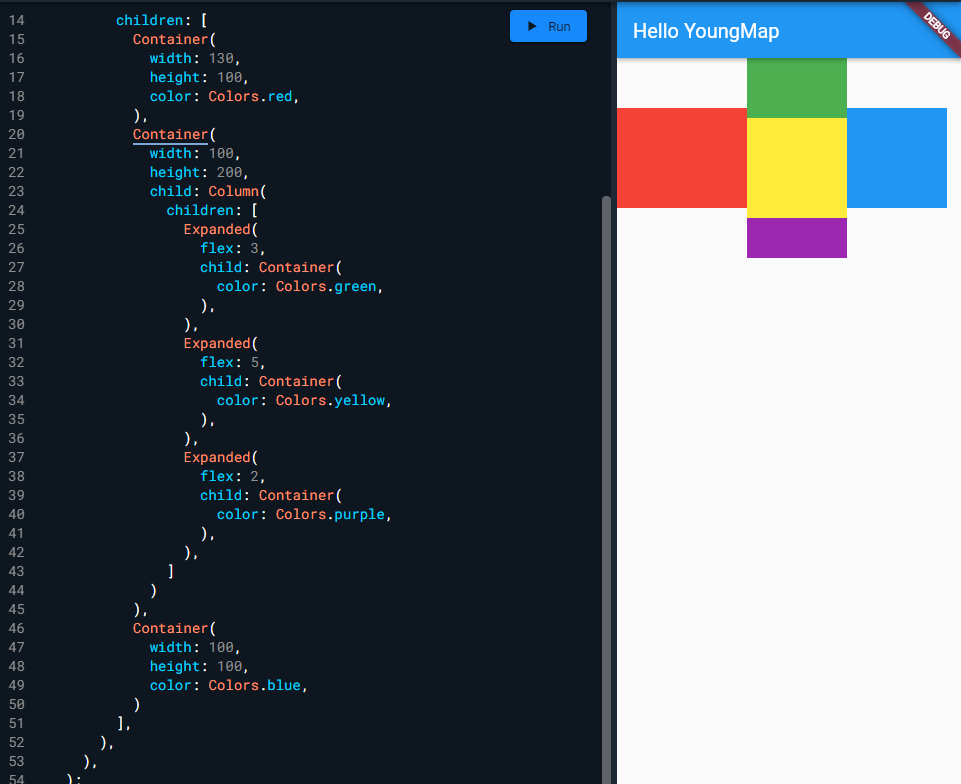
4. Expanded flex 옵션
flex 옵션을 넣으면 비율로 자동 계산하여 채워준다.
Container(
  width: 100,
  height: 200,
  child: Column(
    children: [
      Expanded(
        flex: 3,
        child: Container(
          color: Colors.green,
        ),
      ),
      Expanded(
        flex: 5,
        child: Container(
          color: Colors.yellow,
        ),
      ),
      Expanded(
        flex: 2,
        child: Container(
          color: Colors.purple,
        ),
      ),
    ]
  )
),
이상으로 지금까지 배운 레이아웃을 학습해보았다.
반응형
'IT 이야기' 카테고리의 다른 글
| [클라우드] CSP vs MSP 차이 알아보기 (0) | 2022.02.24 |
|---|---|
| 간편한 URL 단축기 어플 추천 (0) | 2022.01.15 |
| [Flutter] 레이아웃 학습 2편 Column / Row 실습 (0) | 2022.01.14 |
| [Flutter] 레이아웃 학습 1편 Container 실습 (0) | 2022.01.14 |
| [Flutter] SingleChildScrollView 위젯 사용 주의사항 (ListView 관련 오류) (1) | 2022.01.14 |


